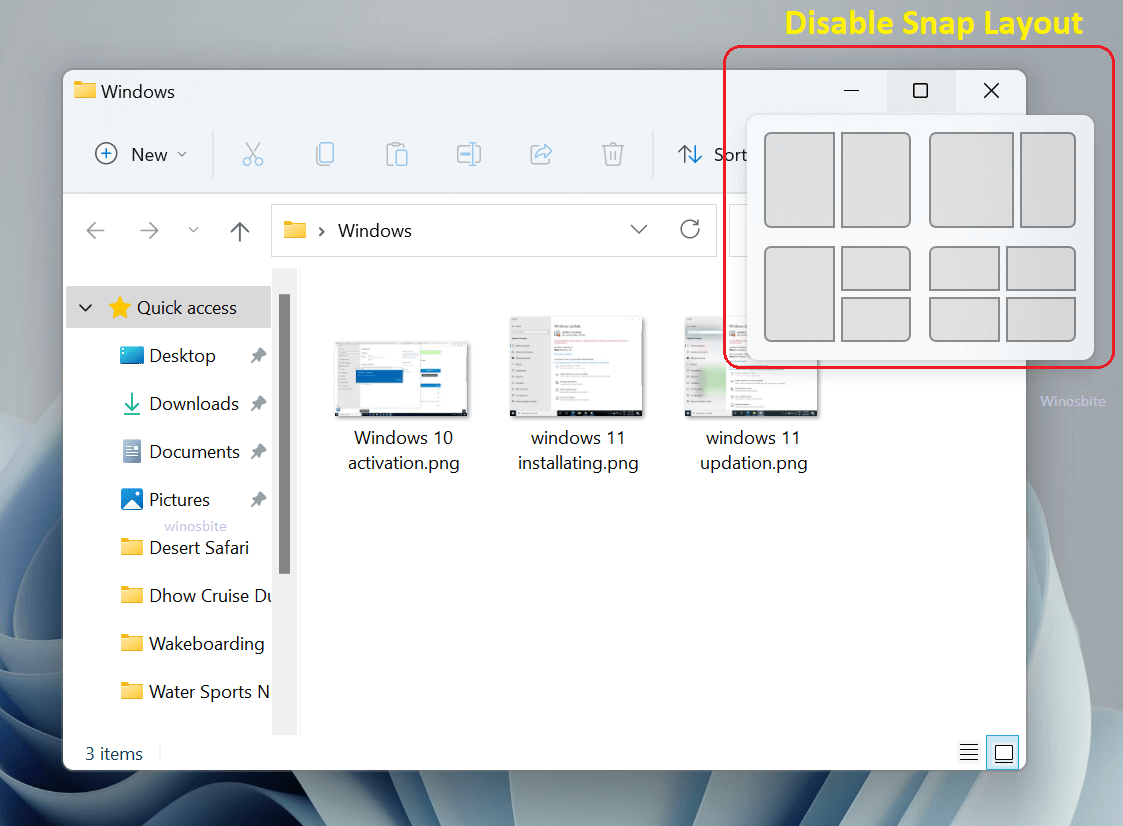
The Snap Layout utility is a feature of Windows 11 that enables the user to simultaneously view all the open windows on the screen. Although this feature has been around Windows 7, Windows 11 is where the utility has seriously leveled up. The feature can be accessed either by pressing the Windows key + Z or by hovering the cursor over the maximize button.

The Snap Groups utility is an extension of the Snap Layouts and it was added to enhance functionality. Thanks to this utility, users can categorize the applications any way they choose, and Windows will have both the applications as well as the categorization committed to memory.
One of the changes also includes the option of customizing the layout itself, whether that’s in grid-like structures or long narrow panes. The Snap Layout feature can be configured to fit the size of your system screen and is redolent of the FancyZones utility. The layouts include:
- Layout 1 – The windows are split into two equal sections.
- Layout 2 – The windows are split into two sections, with the pane on the left being larger.
- Layout 3 – The windows are split into three sections, with one pane taking up half of the screen and the other two panes being stacked vertically on the rest of the screen.
- Layout 4 – The windows are split equally into a four-grid system.
- Layout 5: The windows are horizontally split into 3 equal panes.
- Layout 6: The windows are horizontally split into 3 panes, with the middle pane being larger than the two other panes.
While the Snap Layout utility is nifty, it isn’t for everyone. If you’re particularly annoyed by the layouts appearing on the screen every time you hover your mouse over the maximize button, here’s how you can disable it.
![]() Shortcut key of Snap Layout is Windows + Z
Shortcut key of Snap Layout is Windows + Z
Disable Snap Layout via Settings
Here are the steps to disable the Snap Layout on Windows 11:
1. Press Windows + I button
2. Scrawl down and select Multitasking
3. Click on the arrow button located under Snap windows

4. Now uncheck the box ‘Show snap layouts when I hover over a window’s maximize button‘

5. Now close the window
The feature should be disabled, and you can exit the Settings app.
If you wish to re-enable the feature, simply reverse the step 4 as mentioned above.
Bonus tip:
There is a quick way to disable the Snap Layout pop-up menu when moving the mouse over Maximize button. Press the Windows button, type Snap Flyout Settings, click on it and turn off the radio button in Snap Windows.
Here is how to resize Taskbar in Windows 11.
Enable or Disable the Snap Layout Option using Registry Editor
If you’re experienced Windows user and wanted to disable the windows 10 snap assist option using registry editor then here are the steps:
1. Press the Windows + R key together
2. Type regedit and press the enter button
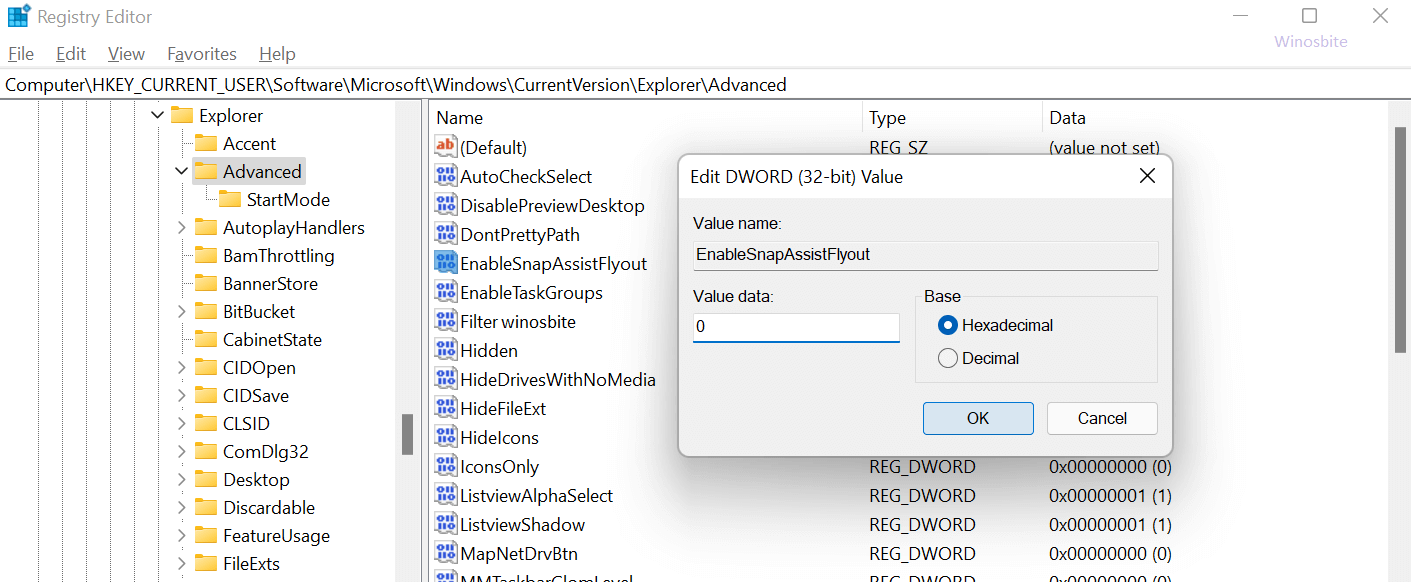
3. Now Navigate to:
HKEY_CURRENT_USER\Software\Microsoft\Windows\CurrentVersion\Explorer\Advanced
4. Now, right click on EnableSnapAssistFlyout and enter 0 (zero) and click on Ok.

5. Now close the Registry editor and you are done.
Now the Snap Layout option wont be visible when hovering the mouse over maximize button.
Remember, a value data of 1 will ensure that it is enabled and 0 means disabled.
Though if you have no use at all for the Snap Windows utility, here’s how you can disable the service altogether:
- Press the Windows key + I to access the Settings application.
- Go to the System tab, and then click Multitasking.
- Switch off the options for the Snap Windows feature.
This will disable the Snap Layout feature entirely and won’t show the pop-up menu option over the maximize button.

