This is the last article of the Angular 8 Series. In this article, we will discuss the concept of routing in an Angular application. In the basic concept, routing is a process through which we can transfer packets or data from one host to another through a network. In web application development, app routing is mainly used to map any specific URL with any specific objects. It is mainly used to access any specific UI in the application. In the past, the basic web application always used a different approach for routing in comparison to the modern one. In the older approach, we normally use the server-side routing approach. In this approach, the server normally generates the HTML related markup and sending to the client or browser. Users may fill some data into the form and again those data send to the server as a response. But, nowadays JavaScript framework or client-side framework becomes much more advanced compared previously. So, for generating HTML markup data, currently, we are not dependable on the server only. We can build that on the client-side and send it back to the browser. We just need to communicate with the server for the data part only. This type of routing concept is normally known as Client-Side routing which we will discuss in brief in this article.
Introduction to Client-Side Routing
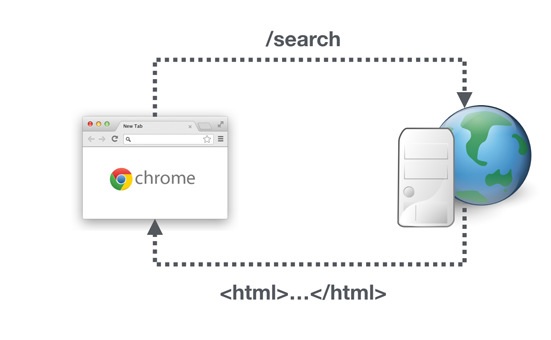
Each and every web application always contains a URL that is normally shown in the address bar of the browser. Basically, this URL defines the current state of the application. As we known state means “all the stored information, at a given instant in time, to which program or application can access”. So in simple words, the state of an application is the current value of all the variables in the application. The Address in the URL can’t store a large volume of information, but using the URL we can bring the same state in the browser for the multiple users. As discussed in the previous section, in the traditional applications we normally user Server-Side Routing. In this process, the browser raises a request to the server to return some HTML markup data which it will display. The below image clearly has shown the process.

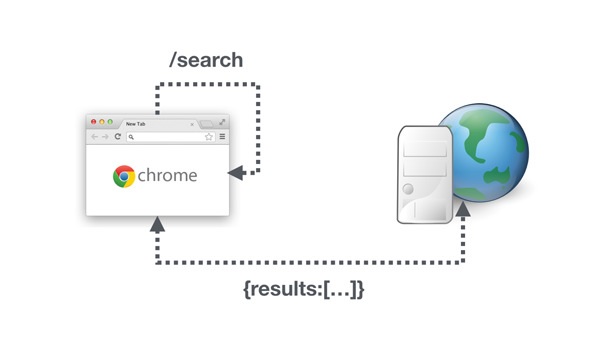
But we want to implement Client-Side Routing in our applications. In this process, when the URL changes in the browser address bar, our local application which is running in the browser (the client) needs to handle the changes. We do not want to send the request to the server. When we will navigate to a new site, the server returns the HTML, JavaScript, and CSS needed to render that application or page. After that, all the further changes to the URL will be handled locally by the client application. For retrieving the information related to the next UI which need to be shown, the client application will call one or more API request in the client application. At that time, a single HTML page will be returned from the server, then onwards all further modification of the page will be handled by the client and that’s why it is called a Single Page Application (SPA).

The main advantage of the SPA based applications are,
- It is much faster, since instead of making a time-consuming request to a long-distance server every time the URL changes, the client application updates the page much faster.
- Less bandwidth or network traffic. We didn’t need to send a large HTML page for every URL change request. Instead of that we just need to call a smaller API which returns just enough data to render the change in the page.
- It is much more convenient. Since a single developer now can build most of the functionality of a site instead of splitting the effort between a front-end and a back-end or server-side developer.
Using the different modules in the Angular Framework, we can implement our web application as a SPA. For this purpose, Angular always followed a basic concept called Component Router.
Route Definition Objects
So, before going to discuss the Angular Router Modules, we first need to discuss route definition objects. For defining the router definition objects, we need to define the route type which is basically is an array of routes that defines the routing for the client application. Within this array, we can mention setup related to the expected paths, the related components which we want to use or open using the route. Each route can be defined with different attributes. Some of the common and most used attributes are,
- path – This attribute is used to mention the URL which will be shown in the browser when the application is redirecting on the specific route.
- component – This attribute is used to mention the name of the component which will be rendered when the application is on the specific route
- redirectTo – This attribute is an optional attribute. It needs to mention when we need to redirect any specific route if our main route is missing. The value of this attribute will be either component name or redirect attribute defined in the route.
- pathMatch – It is also an optional attribute property that defaults to 'prefix'. It determines whether to match full URLs or just the beginning. When defining a route with empty path string set pathMatch to 'full', otherwise it will match all paths.
- children – This attribute contains an array of route definitions objects representing the child routes of this route.
To use Routes, we need to define an array of route configurations as below,
- const routes: Routes = [
- { path: 'component-one', component: ComponentOne },
- { path: 'component-two', component: ComponentTwo }
- ];
Concept of Router Modules
To implement routes in any web application, we need to import RouterModule in our application with the help of NgModules. RouterModule.forRoot takes the Routes array as an argument and returns a configured router module. The following sample shows how we import this module in an app.routes.ts file.
- import { RouterModule, Routes } from '@angular/router';
- const routes: Routes = [
- { path: 'component-one', component: ComponentOne },
- { path: 'component-two', component: ComponentTwo }
- ];
- export const routing = RouterModule.forRoot(routes);
- import { routing } from './app.routes';
- @NgModule({
- imports: [ BrowserModule,routing],
- declarations: [AppComponent,ComponentOne,ComponentTwo],
- bootstrap: [ AppComponent ]
- })
- export class AppModule {
- }
- export const routes: Routes = [
- { path: '', redirectTo: 'component-one', pathMatch: 'full' },
- { path: 'component-one', component: ComponentOne },
- { path: 'component-two', component: ComponentTwo }
- ];
The pathMatch property, which is mainly required for redirects, instructs the router how it should match the URL provided in order to redirect to the specified route. Since pathMatch: full is mentioned, the router will be redirected to component-one when the entire URL matches ('').
In this way, when the application starts, the router system automatically loads the component-one component at the beginning as the default route.
Router Link
We can also control the navigation by using the ruterLink directive in the HTML template like as below –
- <nav class="navbar navbar-light bg-faded">
- <a class="navbar-brand" [routerLink]="['component-one']">Component 1</a>
- <ul class="nav navbar-nav">
- <li class="nav-item active">
- <a class="nav-link" [routerLink]="['']">Home</a>
- </li>
- <li class="nav-item">
- <a class="nav-link" [routerLink]="['component-two']">Component 2</a>
- </li>
- </ul>
- </nav>
- this.router.navigate(['/component-one']);
- <a class="nav-link"
- [routerLink]="['home']"
- [routerLinkActive]="['active']">Home</a>
Add Route Component
In spite of defining each route component separately, we can use RouterOutlet directives which basically acts as a component placeholder in our application. Angular Framework dynamically injects the components for the active route within the <router-outlet></router-outlet> element.
- <router-outlet></router-outlet>
In the above example, the component related to the route specified will be activated after the <router-outlet></router-outlet> element when the router link is clicked.
Demo 1 - Route Demo
For the demonstration of the route example in Angular, we first need to develop 3 components that are independent and can be used as a route component. For that purpose, we first create the below components – MobileComponent, TVComponent and ComputerComponent, and HomeComponent.
app.component.tv.ts
- import { Component, OnInit } from '@angular/core';
- @Component({
- selector: 'app-tv',
- templateUrl: 'app.component.tv.html'
- })
- export class TvComponent implements OnInit {
- private data: Array<any> = [];
- constructor() {
- this.data = [{ name: 'LED TV 20"', company: 'Samsung', quantity: '10', price: '11000.00' },
- { name: 'LED TV 24"', company: 'Samsung', quantity: '50', price: '15000.00' },
- { name: 'LED TV 32"', company: 'LG', quantity: '10', price: '32000.00' },
- { name: 'LED TV 48"', company: 'SONY', quantity: '25', price: '28000.00' }];
- }
- ngOnInit(): void {
- }
- }
app.component.tv.html
- <div class="panel-body">
- <table class="table table-striped table-bordered">
- <thead>
- <tr>
- <th>Name</th>
- <th>Company</th>
- <th class="text-right">Quantity</th>
- <th class="text-right">Price</th>
- </tr>
- </thead>
- <tbody>
- <tr *ngFor="let item of data">
- <td>{{item.name}}</td>
- <td>{{item.company}}</td>
- <td class="text-right">{{item.quantity}}</td>
- <td class="text-right">{{item.price | currency}}</td>
- </tr>
- </tbody>
- </table>
- </div>
app.component.mobile.ts
- import { Component, OnInit } from '@angular/core';
- @Component({
- selector: 'app-mobile',
- templateUrl: 'app.component.mobile.html'
- })
- export class MobileComponent implements OnInit {
- private data: Array<any> = [];
- constructor() {
- this.data = [{ name: 'Galaxy Tab 3', company: 'Samsung', quantity: '10', price: '25000.00' },
- { name: 'Galaxy Tab 5', company: 'Samsung', quantity: '50', price: '55000.00' },
- { name: 'G4', company: 'LG', quantity: '10', price: '40000.00' },
- { name: 'Canvas 3', company: 'Micromax', quantity: '25', price: '18000.00' }];
- }
- ngOnInit(): void {
- }
- }
app.component.mobile.html
- <div class="panel-body">
- <table class="table table-striped table-bordered">
- <thead>
- <tr>
- <th>Name</th>
- <th>Company</th>
- <th class="text-right">Quantity</th>
- <th class="text-right">Price</th>
- </tr>
- </thead>
- <tbody>
- <tr *ngFor="let item of data">
- <td>{{item.name}}</td>
- <td>{{item.company}}</td>
- <td class="text-right">{{item.quantity}}</td>
- <td class="text-right">{{item.price |currency:'INR':true}}</td>
- </tr>
- </tbody>
- </table>
- </div>
app.component.computer.ts
- import { Component, OnInit } from '@angular/core';
- @Component({
- selector: 'computer',
- templateUrl: 'app.component.computer.html'
- })
- export class ComputerComponent implements OnInit {
- private data: Array<any> = [];
- constructor() {
- this.data = [{ name: 'HP Pavilion 15"', company: 'HP', quantity: '10', price: '42000.00', specification: 'Intel Core i3 2 GB Ram 500 GB HDD with Windows 10' },
- { name: 'Lenovo Flex 2"', company: 'Lenovo', quantity: '20', price: '32000.00', specification: 'Intel Core i3 2 GB Ram 500 GB HDD with DOS OS' },
- { name: 'Lenovo Yova 500"', company: 'Lenovo', quantity: '20', price: '70000.00', specification: 'Intel Core i7 8 GB Ram 1TB HDD with Windows 8.1' }]
- }
- ngOnInit(): void {
- }
- }
app.component.computer.html
- <div class="panel-body">
- <table class="table table-striped table-bordered">
- <thead>
- <tr>
- <th>Name</th>
- <th>Company</th>
- <th class="text-right">Quantity</th>
- <th class="text-right">Price</th>
- </tr>
- </thead>
- <tbody>
- <tr *ngFor="let item of data">
- <td>{{item.name}}</td>
- <td>{{item.company}}</td>
- <td class="text-right">{{item.quantity}}</td>
- <td class="text-right">{{item.price | currency}}</td>
- </tr>
- </tbody>
- </table>
- </div>
app.component.home.ts
- import { Component, OnInit } from '@angular/core';
- @Component({
- selector: 'home',
- templateUrl: 'app.component.home.html'
- })
- export class HomeComponent implements OnInit {
- private message: string = '';
- constructor() {
- this.message = 'Click link to move other pages';
- }
- ngOnInit(): void {
- }
- }
app.component.home.html
- <div class="row">
- <div class="panel-body">
- Home Page
- <br />
- <h3 class="panel-heading"><span>{{message}}</span></h3>
- </div>
- </div>
Now, we need to define the router link in the app-root component so that we can navigate between the different route components.
app.component.ts
- import { Component } from '@angular/core';
- @Component({
- selector: 'app-root',
- templateUrl: './app.component.html',
- styleUrls: ['./app.component.css']
- })
- export class AppComponent {
- title = 'Ang8RouteDemo';
- }
app.component.html
- <div class="toolbar" role="banner">
- <img
- width="40"
- alt="Angular Logo"
- src="data:image/svg+xml;base64,PHN2ZyB4bWxucz0iaHR0cDovL3d3dy53My5vcmcvMjAwMC9zdmciIHZpZXdCb3g9IjAgMCAyNTAgMjUwIj4KICAgIDxwYXRoIGZpbGw9IiNERDAwMzEiIGQ9Ik0xMjUgMzBMMzEuOSA2My4ybDE0LjIgMTIzLjFMMTI1IDIzMGw3OC45LTQzLjcgMTQuMi0xMjMuMXoiIC8+CiAgICA8cGF0aCBmaWxsPSIjQzMwMDJGIiBkPSJNMTI1IDMwdjIyLjItLjFWMjMwbDc4LjktNDMuNyAxNC4yLTEyMy4xTDEyNSAzMHoiIC8+CiAgICA8cGF0aCAgZmlsbD0iI0ZGRkZGRiIgZD0iTTEyNSA1Mi4xTDY2LjggMTgyLjZoMjEuN2wxMS43LTI5LjJoNDkuNGwxMS43IDI5LjJIMTgzTDEyNSA1Mi4xem0xNyA4My4zaC0zNGwxNy00MC45IDE3IDQwLjl6IiAvPgogIDwvc3ZnPg=="
- />
- <span>Welcome !! Angular 8 Route Demo</span>
- <div class="spacer"></div>
- <a aria-label="Angular on twitter" target="_blank" rel="noopener" href="https://twitter.com/angular" title="Twitter">
- <svg id="twitter-logo" height="24" data-name="Logo — FIXED" xmlns="http://www.w3.org/2000/svg" viewBox="0 0 400 400">
- <defs>
- <style>
- .cls-1 {
- fill: none;
- }
- .cls-2 {
- fill: #ffffff;
- }
- </style>
- </defs>
- <rect class="cls-1" width="400" height="400" />
- <path class="cls-2" d="M153.62,301.59c94.34,0,145.94-78.16,145.94-145.94,0-2.22,0-4.43-.15-6.63A104.36,104.36,0,0,0,325,122.47a102.38,102.38,0,0,1-29.46,8.07,51.47,51.47,0,0,0,22.55-28.37,102.79,102.79,0,0,1-32.57,12.45,51.34,51.34,0,0,0-87.41,46.78A145.62,145.62,0,0,1,92.4,107.81a51.33,51.33,0,0,0,15.88,68.47A50.91,50.91,0,0,1,85,169.86c0,.21,0,.43,0,.65a51.31,51.31,0,0,0,41.15,50.28,51.21,51.21,0,0,1-23.16.88,51.35,51.35,0,0,0,47.92,35.62,102.92,102.92,0,0,1-63.7,22A104.41,104.41,0,0,1,75,278.55a145.21,145.21,0,0,0,78.62,23"
- />
- </svg>
- </a>
- </div>
- <div class="content" role="main">
- <span><h2>{{ title }} app is running!</h2></span>
- <table style="width:40%;">
- <tr class="table-bordered">
- <td><a routerLink="/home" class="btn-block" routerLinkActive="['active']">Home</a></td>
- <td><a routerLink="/mobile">Mobile</a></td>
- <td><a routerLink="/tv">TV</a></td>
- <td><a routerLink="/computer">Computers</a></td>
- </tr>
- </table>
- <br/>
- <div class="spacer">
- <router-outlet></router-outlet>
- </div>
- </div>
app-routing.module.ts
- import { NgModule } from '@angular/core';
- import { Routes, RouterModule } from '@angular/router';
- import { HomeComponent } from './app.component.home';
- import { MobileComponent } from './app.component.mobile';
- import { TvComponent } from './app.component.tv';
- import { ComputerComponent } from './app.component.computer';
- const routes: Routes = [
- { path: '', redirectTo: 'home', pathMatch: 'full' },
- { path: 'home', component: HomeComponent },
- { path: 'tv', component: TvComponent },
- { path: 'mobile', component: MobileComponent },
- { path: 'computer', component: ComputerComponent }
- ];
- @NgModule({
- imports: [RouterModule.forRoot(routes)],
- exports: [RouterModule]
- })
- export class AppRoutingModule { }
app.module.ts
- import { BrowserModule } from '@angular/platform-browser';
- import { NgModule } from '@angular/core';
- import { AppRoutingModule } from './app-routing.module';
- import { AppComponent } from './app.component';
- import { HomeComponent } from './app.component.home';
- import { MobileComponent } from './app.component.mobile';
- import { TvComponent } from './app.component.tv';
- import { ComputerComponent } from './app.component.computer';
- @NgModule({
- declarations: [
- AppComponent, HomeComponent, MobileComponent, TvComponent, ComputerComponent
- ],
- imports: [
- BrowserModule,
- AppRoutingModule
- ],
- providers: [],
- bootstrap: [AppComponent]
- })
- export class AppModule { }
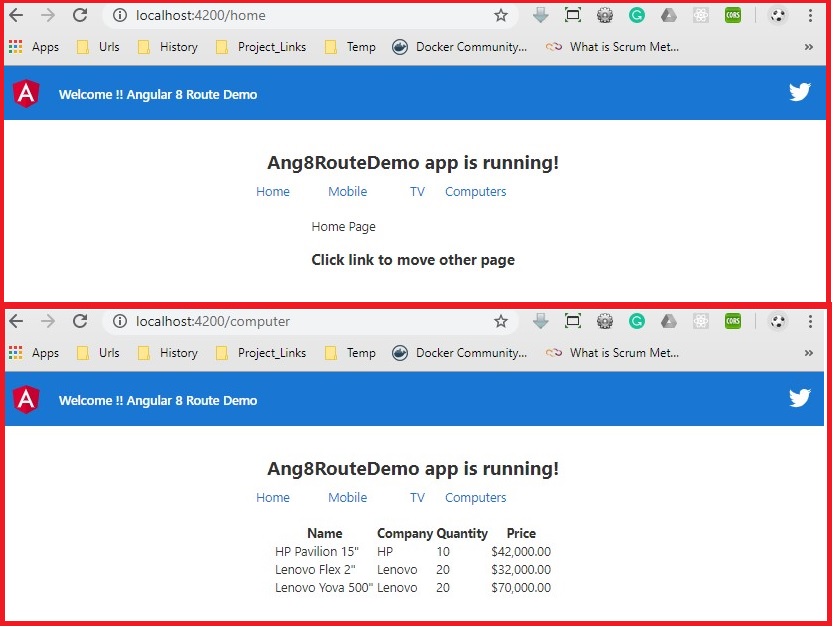
Now run the application in the browser to check the output,

Conclusion
In this article, we discussed how to implement the route concept using the Angular Framework in any web application. Also, we discussed the basic concept of client-side routing along with other routes relates to directives like RouterLink, etc. I hope, this article will help you. Any feedback or query related to this article is most welcome.

